You are currently browsing the monthly archive for August 2008.
Ever since we decided to send Eleanor to nursery school, I have been dreaming of back-to-school supplies. For me, not much compares to a fresh bunch of pencils, erasers, notebooks, and folders. (I wonder if they still make Trapper Keepers?) Anyway, I feel like any school child, even a nursery school child, needs a bag to hold all of these little luxuries. In this case though, it will principally serve to bring artwork and notes home, so I decided a tote bag was the best option.
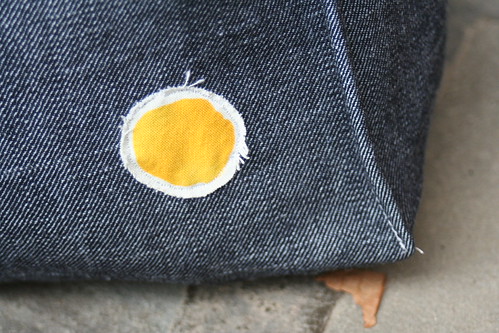
I looked around a bit for a tutorial that would serve my purposes. I found approximately what I was looking for at Not So Fancy Nancy, and decided I was confident enough (maybe overly so!) to adapt the tutorial to the vision in my head. I used smaller proportions than her tutorial called for (after all, it is for a preschooler), I added a layer of flannel inside the bird fabric to give it more structure, and I opted out of the small handles. Oh, and I added a couple of appliques from the interior fabric to the outside of the bag before I started sewing for a bit of extra charm.
Once I had finished, I decided the bag was a bit of an amorphous blob so I pinned the corners down and stitched along the edges. This gave it a bit more of a rectangular shape, which pleased me. One problem I did have though, was that the heavy denim, plus flannel, plus cotton interior fabric made it so thick that my machine couldn’t make it all the way through the area by the strap. So, I just decided not to worry about it. I went as far as I could and that was that. The bag also ended up being a bit long for Eleanor, but I figure she can grow into it — and I will be able to carry it over my shoulder as well. What do you think?


It is fun when kids get to the age where they can use paint and crayons and all sorts of other good art materials. Henry is just getting to that age. Paint and crayons occasionally still make it to his mouth but we have the non-toxic stuff so I am hoping a tiny bit won’t hurt.
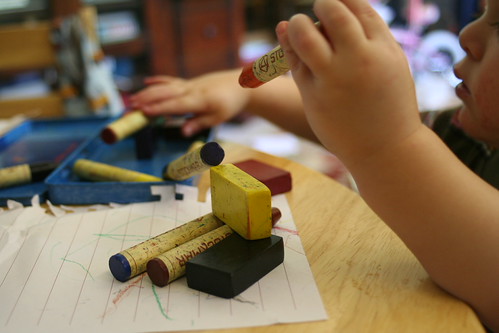
The other day, we worked on a collaborative piece on a big canvas. I have (embarrassingly) had the canvas for multiple years, intending to paint something on it. I finally decided that the kids would enjoy it much more, so we headed outside and brought the paint along.

Once we had finished (or so I thought), Eleanor decided that she wanted to paint the back too. How clever, never wasting a space. Once the back was completed, we let it dry and now the reddish brown canvas with Henry’s bum print hangs right over our fireplace.

The aftermath, though, required the garden hose.

Have you ever read Little Bear by Else Holmelund Minarik? In particular, the story where Little Bear wants something to put on? Well, Dear Giraffe, one of Eleanor’s favorite loveys was feeling a little cold a couple of weeks ago. Since a fall-like feeling is beginning to creep into the air, I devised this incredibly simple “sweater” for Dear Giraffe because we certainly don’t want him to catch a chill. It is just a rectangle of flannel with sides turned under and stitched around.

(Sorry about the wrinkles, I just didn’t have it in me to press it before the pictures.)
I used a fancy stitch (my machine is ancient, so this constitutes fancy), just to dress up the edges a bit.

I didn’t even do anything with the arm (leg?) holes other than just straight stitch around so they wouldn’t fray too much. A little ribbon to hold it on and we have a warm and cozy sweater.

These pears are from the tree in our yard and they are delicious. I guess this isn’t technically “crafty” but it is food related and I just thought they were beautiful. And, it is something to look at while I get the other photos organized!

It has been so long since I have written here. I have been busy as a bee with the family, the house and the crafty stuff but not so busy with the camera and picture downloads and uploads! At any rate, I will get back in the swing with the camera. Promise.
For now, here are a few preview bits about what I have been working on:
– Artist apron for my daughter’s art teacher. Unfortunately, we already gave this gift and I totally forgot to take a picture beforehand. I think it turned out well, sort of raw-looking canvas with green accent stitching and an appliqued leaf print (similar to the shirt in this post).
– Hair clips. I have seen a couple of blogs (slipping my mind now which ones) refer back to a post on Angry Chicken I had starred a while back. So, I tried making a few.
– School bag for my little girl. More to come on this.
– Granola bars. I have been eyeing this Makes and Takes recipe and this Super Healthy Kids recipe. Today I ended up making the Super Healthy Kids bars and they were terrific. I added a bit of ginger, cloves, apricot and coconut to the basic recipe and they are almost gone. So, sorry there will not be a picture of the first batch.
– And finally, I started a delicious list. In part to keep track of projects I want to try and also to (hopefully) make dinner prep easier by having an online cookbook of sorts. I guess this isn’t technically crafty, but I do hope it inspires more organization, which will free up time for craftiness. At least, that’s the plan!
I finally got the dress on my daughter for a picture and it is HUGE. Teri made a comment on the dress post about how American pattern companies run large and, boy, was she right. At any rate, it will be something for her to grow into and a good learning experience for me. (No way am I messing with that zipper to alter it!)

Also, I had some left over fabric from the baby blanket gift I made a couple of weeks ago and I decided to make a little stuffed something for the baby to match. It ended up being (a very loose interpretation of) a bird, though I didn’t start off with any specific idea in my head. I used some of the left over wool stuffing from the Waldorf doll to fill it, so it has that same nice, natural lanolin smell. Hopefully, the little one will like it — though babies always seem to have a mind of their own when picking a lovey.

I also worked on a couple other little things today but I’ll save those for another post.
Five years ago I spent a lovely vacation with my grandmother. It was before I was married with kids and we were free to do whatever we wanted. (Don’t read that the wrong way, I don’t feel burdened by my kids and husband — it is just that there is a different sort of fluidity to the day when you are not responsible for naps, meals, etc.) One specific thing that I wanted to do during the vacation, in addition to visiting family, seeing the old homestead, eating butter tarts, etc., was make crabapple jelly. It was always a staple at our house, lovingly made each year by Nana. It is also the type of thing that I needed to experience with her if I ever wanted to be able to recreate it on my own.
So, here are the instructions. I basically wrote down exactly what Nana said, word for word and snapped a few pictures along the way.
Pick the apples when they are ready, late August or early September. Get a couple of baskets of crabapples (off the tree, not the ground). Wash them.

Cut them to check for worms, take out the stem and some of the seeds. Put them in a large pot with some water — not quite to the top of where the crabapples are.


Boil until they are done and the water has thickened into kind of a mushy sauce.

Set up the bags for juicing. Once the apples are ready, put them in the bags and let them drain. Once they are cool, squeeze any additional juice into the bowl. Put into jars and refrigerator for the next step (this is not entirely necessary).


Get wax ready. [In otherwords, melt it.]

Put two tablespoons of Certo Crystals with three cups of juice into a pot. [Certo Crystals, as I understand it, are a type of pectin.] Heat on high until it comes to a boil and make sure all of the crystals are dissolved.

Add 4 cups of sugar [Really?! We used that much? No wonder it is so good.] and bring to a boil. Boil for 1 minute. Add about 1 tsp of butter, to prevent too much scum, just as it starts to boil. Skim any scum off. [Nice. There’s got to be a better word than scum, eh?]

Pour jelly into jars. Have melted wax (paraffin) ready and pour over top of the jelly. Wait until paraffin sets to put the lids on.

That’s it folks. I also have a little list that I made at the bottom of my notes and since I’ve written everything else from that day here, I’ll add this little list too. I can’t remember if she meant that these fruits require more/less pectin in the mix or if the fruits naturally have more/less pectin in them. I am tending to think the latter, but I may just call her and ask.
More pectin: red/black currants, crabapples, wild grapes
Less pectin: elderberries, blueberries, strawberries, cherries
I finished my first piece of clothing for my daughter. It took me a long time, mostly because it is hard to find time to sit and sew and also partly because I had to read each step in the instructions 600 times before actually doing anything. By the end of the day, I am usually too tired to focus on something detailed (or reading and rereading instructions) and during the day there is no time chasing two toddlers around. Nonetheless, I got it done. And, I am pretty darn proud of it!
I have always found patterns rather intimidating. I am a pretty adventurous person but for some reason an envelope-enclosed tissue paper clothing pattern seemed daunting. Probably because I am more a make-it-up-as-you-go type person, which is good for lots of things but not necessarily for someone with approximately no clothes-making experience trying to make a dress with a zipper. So, I knew that in order for this to work, I needed to follow the pattern.
I picked this pattern (Butterick See & Sew B4765), which says in a big red box on the front “Yes! It’s easy.” I took that as a sign that I could probably figure it out. Well, when I got home and started trying to figure out what size to cut, it took me at least two nights to realize that I had bought the smaller of the two pattern sizes (A or 1, 2, 3 instead of B or 4, 5, 6). Turns out that was fine, the largest size in the A package (3), is just about right for my tall 2.5 year old. I’m sure if I was a bit more experienced, I probably could have altered it as well, but, if I was more advanced, I probably wouldn’t have bought what I thought was the wrong size!
So, here it is. I used some almost gauzy cotton fabric, which I wouldn’t do again. It was hard to work with and frayed a lot at the edges. Nonetheless, I managed to get it done, even if the stitching around the zipper is slightly crooked. Oh, and I wanted to take pictures while it was on, but I haven’t actually been able to get her out of her Cinderella nightgown to wear it yet. Ahh, toddlers.
The dress:

Detail of gathering:

Detail of pocket (for adventure walks, of course):


